Configuring Windows Hosts for Ansible: Step-by-Step Guide
By Luca Berton · Published 2024-01-01 · Category: installation
Learn how to configure Windows hosts for Ansible using basic authentication and WinRM. Follow our step-by-step guide to set up and run your first playbook.
How to configure a Windows Host for Ansible?
I'll show you step by step on a freshly installed machine how to configure a "basic" authentication, use a Local Accounts for authentication and successfully execute a simple "win_ping" Ansible Playbook. This initial configuration sometimes is a roadblock for some Windows users to start using Ansible.
See also: Ansible on Windows 10 22H2 Automation: Legacy Workstation Migration, Hardening, ESU Complete Guide
Configure a Windows Host for Ansible
- Windows 7, 8.1, 10, 11
- Windows Server 2008, 2008 R2, 2012, 2012 R2, 2016, 2019, 2022
- PowerShell 3.0+ and .NET 4.0+
- WinRM or OpenSSH (experimental)
Links
## Playbook
How to configure a Windows Host for Ansible connections.
- Create a user
- verify PowerShell & .NET
- setup WinRM
- create Inventory & Playbook
win_ping module to verify the successful configuration.
Windows node
Create an "ansible" user
- open Computer Management (right-click from "This PC" > "Manage")
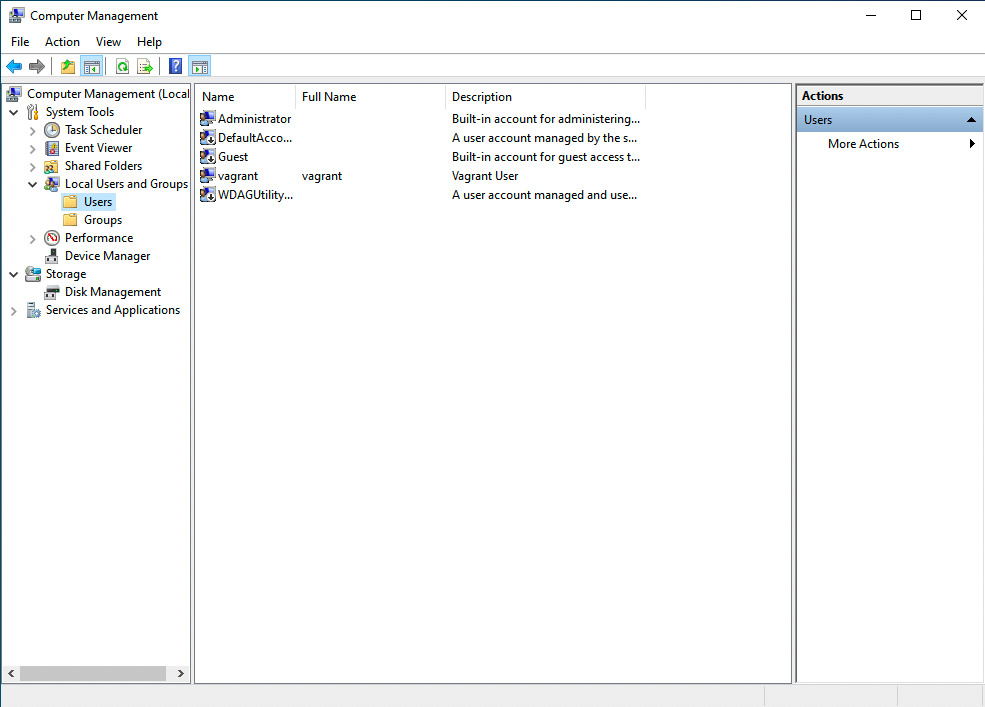
- New User (right-click from "Users" > "New User")
Password never expires disable User must change password at next logon

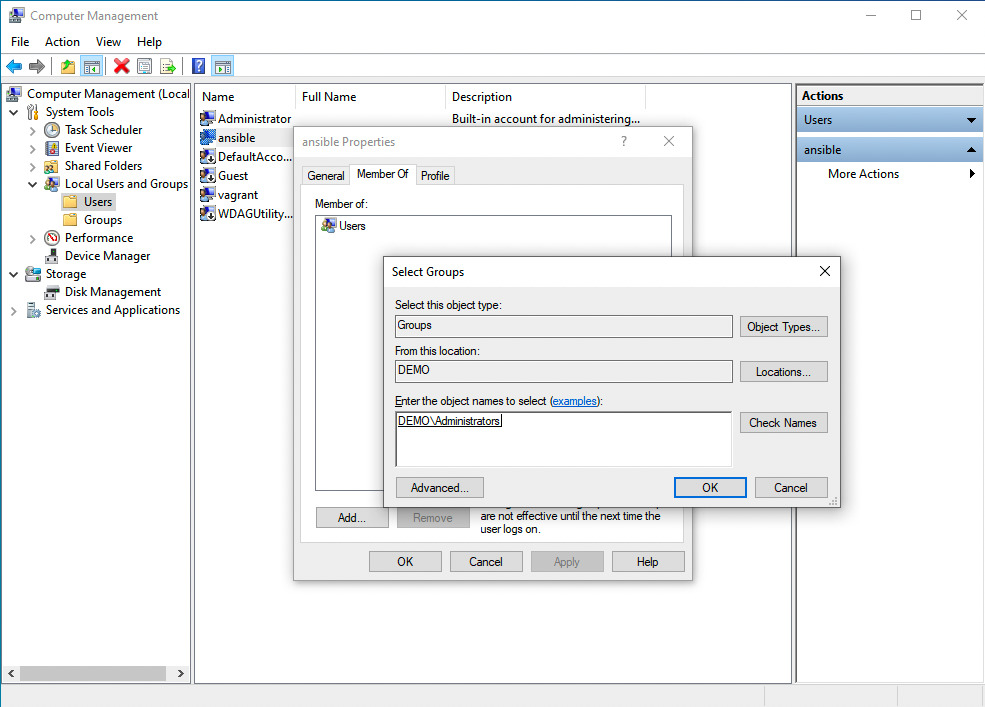
- Add "ansible" user to "administrators" Group
Verify PowerShell, .NET and set up WinRM
- verify PowerShell version
Windows PowerShell
Copyright (C) Microsoft Corporation. All rights reserved.
Try the new cross-platform PowerShell https://aka.ms/pscore6
PS C:\Users\vagrant> Get-Host | Select-Object Version
Version
-------
5.1.19041.1237- verify .NET version
PS C:\Users\vagrant> Get-ChildItem 'HKLM:\SOFTWARE\Microsoft\NET Framework Setup\NDP' -Recurse | Get-ItemProperty -Name version -EA 0 | Where { $_.PSChildName -Match '^(?!S)\p{L}'} | Select PSChildName, version
>>
PSChildName Version
----------- -------
Client      4.8.04084
Full        4.8.04084
Client      4.0.0.0
PS C:\Users\vagrant>- Verify WinRM not-configured
PS C:\Users\vagrant> winrm get winrm/config/Service
WSManFault
    Message = The client cannot connect to the destination specified in the request. Verify that the service on the destination is running and is accepting requests. Consult the logs and documentation for the WS-Management service running on the destination, most commonly IIS or WinRM. If the destination is the WinRM service, run the following command on the destination to analyze and configure the WinRM service: "winrm quickconfig".
Error number:  -2144108526 0x80338012
The client cannot connect to the destination specified in the request. Verify that the service on the destination is running and is accepting requests. Consult the logs and documentation for the WS-Management service running on the destination, most commonly IIS or WinRM. If the destination is the WinRM service, run the following command on the destination to analyze and configure the WinRM service: "winrm quickconfig".
PS C:\Users\vagrant> winrm get winrm/config/Winrs
WSManFault
    Message = The client cannot connect to the destination specified in the request. Verify that the service on the destination is running and is accepting requests. Consult the logs and documentation for the WS-Management service running on the destination, most commonly IIS or WinRM. If the destination is the WinRM service, run the following command on the destination to analyze and configure the WinRM service: "winrm quickconfig".
Error number:  -2144108526 0x80338012
The client cannot connect to the destination specified in the request. Verify that the service on the destination is running and is accepting requests. Consult the logs and documentation for the WS-Management service running on the destination, most commonly IIS or WinRM. If the destination is the WinRM service, run the following command on the destination to analyze and configure the WinRM service: "winrm quickconfig".
PS C:\Users\vagrant> winrm enumerate winrm/config/Listener
WSManFault
    Message = The client cannot connect to the destination specified in the request. Verify that the service on the destination is running and is accepting requests. Consult the logs and documentation for the WS-Management service running on the destination, most commonly IIS or WinRM. If the destination is the WinRM service, run the following command on the destination to analyze and configure the WinRM service: "winrm quickconfig".
Error number:  -2144108526 0x80338012
The client cannot connect to the destination specified in the request. Verify that the service on the destination is running and is accepting requests. Consult the logs and documentation for the WS-Management service running on the destination, most commonly IIS or WinRM. If the destination is the WinRM service, run the following command on the destination to analyze and configure the WinRM service: "winrm quickconfig".
PS C:\Users\vagrant>- Setup WinRM
PS C:\Users\vagrant> [Net.ServicePointManager]::SecurityProtocol = [Net.SecurityProtocolType]::Tls12
>> $url = "https://raw.githubusercontent.com/ansible/ansible/devel/examples/scripts/ConfigureRemotingForAnsible.ps1"
>> $file = "$env:temp\ConfigureRemotingForAnsible.ps1"
>>
>> (New-Object -TypeName System.Net.WebClient).DownloadFile($url, $file)
>>
>> powershell.exe -ExecutionPolicy ByPass -File $file
PS C:\Users\vagrant>- Verify WinRM configured
PS C:\Users\vagrant> winrm get winrm/config/Service
Service
    RootSDDL = O:NSG:BAD:P(A;;GA;;;BA)(A;;GR;;;IU)S:P(AU;FA;GA;;;WD)(AU;SA;GXGW;;;WD)
    MaxConcurrentOperations = 4294967295
    MaxConcurrentOperationsPerUser = 1500
    EnumerationTimeoutms = 240000
    MaxConnections = 300
    MaxPacketRetrievalTimeSeconds = 120
    AllowUnencrypted = true
    Auth
        Basic = true
        Kerberos = true
        Negotiate = true
        Certificate = false
        CredSSP = false
        CbtHardeningLevel = Relaxed
    DefaultPorts
        HTTP = 5985
        HTTPS = 5986
    IPv4Filter = *
    IPv6Filter = *
    EnableCompatibilityHttpListener = false
    EnableCompatibilityHttpsListener = false
    CertificateThumbprint
    AllowRemoteAccess = true
PS C:\Users\vagrant>
PS C:\Users\vagrant> winrm get winrm/config/Winrs
Winrs
    AllowRemoteShellAccess = true
    IdleTimeout = 7200000
    MaxConcurrentUsers = 2147483647
    MaxShellRunTime = 2147483647
    MaxProcessesPerShell = 2147483647
    MaxMemoryPerShellMB = 2147483647
    MaxShellsPerUser = 2147483647
PS C:\Users\vagrant> winrm enumerate winrm/config/Listener
Listener
    Address = *
    Transport = HTTPS
    Port = 5986
    Hostname = WIN10
    Enabled = true
    URLPrefix = wsman
    CertificateThumbprint = F4D065F8FC6EE18F1F0FF9533584955D0C9B8E59
    ListeningOn = 10.0.2.15, 127.0.0.1, 169.254.20.54, ::1, fe80::44a1:482d:5918:7cb4%4, fe80::d017:a935:ff50:4eb4%5
PS C:\Users\vagrant> winrm enumerate winrm/config/Listener
Listener
    Address = *
    Transport = HTTPS
    Port = 5986
    Hostname = WIN10
    Enabled = true
    URLPrefix = wsman
    CertificateThumbprint = F4D065F8FC6EE18F1F0FF9533584955D0C9B8E59
    ListeningOn = 10.0.2.15, 127.0.0.1, 192.168.0.83, ::1, fe80::94b1:dc79:39cf:8b61%4, fe80::d017:a935:ff50:4eb4%5
PS C:\Users\vagrant>
Ansible Controller
Install the pywinrm library
WinRM is not supported out of the box: Ansible talks to Windows over WinRM
through the pywinrm Python library, which is not bundled with Ansible.
This is the most common first-run roadblock — without it win_ping fails with
winrm or requests is not installed: No module named 'winrm'. Install it into
the same Python environment that runs Ansible on the controller:
python3 -m pip install "pywinrm>=0.4.0"code
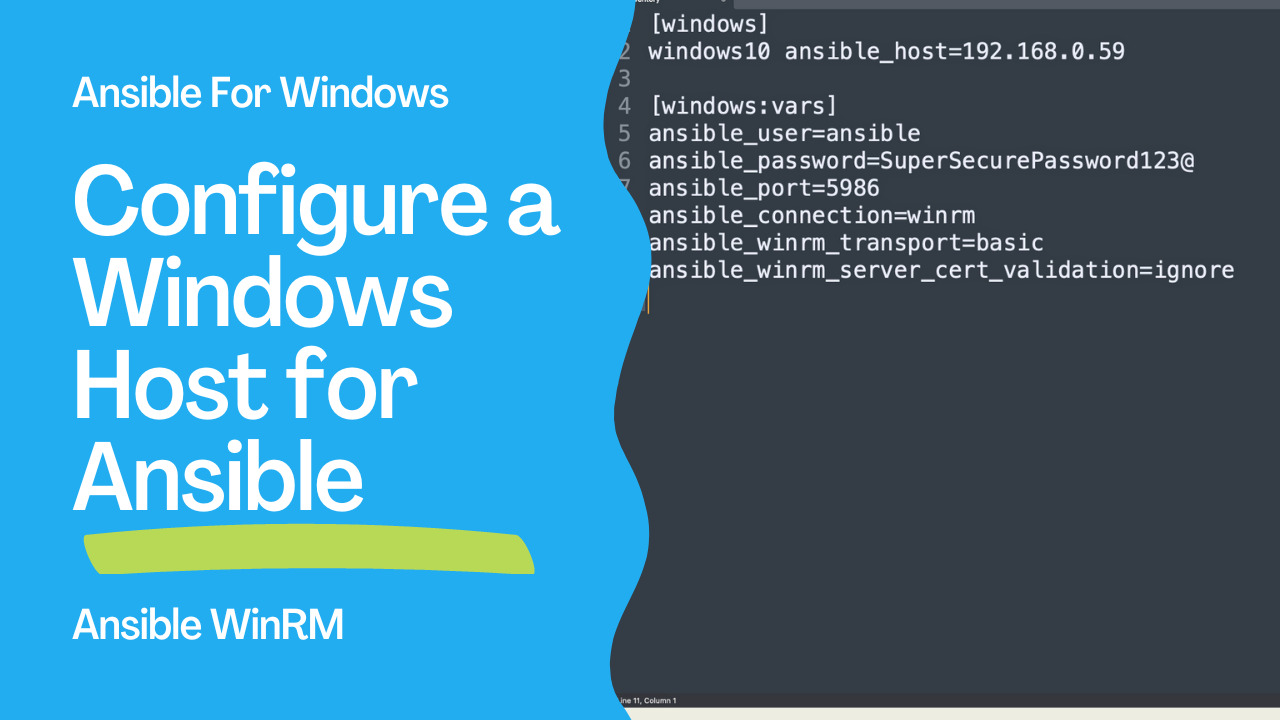
- inventory
[windows]
windows10 ansible_host=192.168.0.59
[windows:vars]
ansible_user=ansible
ansible_password=SuperSecurePassword123@
ansible_port=5986
ansible_connection=winrm
ansible_winrm_transport=basic
ansible_winrm_server_cert_validation=ignore- win_ping.yml
---
- name: win_ping module Playbook
  hosts: windows
  become: false
  gather_facts: false
  tasks:
    - name: test connection
      ansible.windows.win_ping:
execution
ansible-pilot $ ansible-playbook -i windows/inventory windows/win_ping.yml
PLAY [win_ping module Playbook] ***********************************************************************
TASK [test connection] ****************************************************************************
ok: [windows10]
PLAY RECAP ****************************************************************************************
windows10                  : ok=1    changed=0    unreachable=0    failed=0    skipped=0    rescued=0    ignored=0
ansible-pilot $See also: Ansible Change Windows User Password: win_user Module (Examples)
Harden the connection for production (NTLM over HTTPS)
The inventory above uses ansible_winrm_transport=basic, which is the simplest
option to demonstrate but the weakest: Basic authentication only works with
local accounts, requires AllowUnencrypted = true on the service, and sends the
credentials with minimal protection. For anything beyond a lab, switch to
NTLM (or Kerberos in a domain) over the HTTPS listener on port 5986 — it
authenticates domain accounts and encrypts the payload without enabling Basic:
[windows:vars]
ansible_user=ansible
ansible_password=SuperSecurePassword123@
ansible_port=5986
ansible_connection=winrm
ansible_winrm_transport=ntlm
ansible_winrm_server_cert_validation=ignore
A few more hardening steps worth taking before you go live:
- Keep
ansible_passwordout of the inventory — store it in Ansible Vault
--ask-pass instead of plaintext.
- Replace the self-signed certificate with one from your CA and drop
ansible_winrm_server_cert_validation=ignore so the certificate is actually
validated.
- Disable Basic auth and unencrypted traffic on the host once NTLM/Kerberos
Set-Item WSMan:\localhost\Service\Auth\Basic -Value $false and
Set-Item WSMan:\localhost\Service\AllowUnencrypted -Value $false.
Conclusion
Now you know how to configure a Windows host for Ansible: create a dedicated
user, verify PowerShell and .NET, set up the WinRM listener, install pywinrm
on the controller, and confirm connectivity with win_ping — plus how to harden
the connection with NTLM over HTTPS for production use.
See also: Ansible Create Windows Local User: win_user Module (Complete Guide)
Related Articles
Category: installation
Watch the video: Configuring Windows Hosts for Ansible: Step-by-Step Guide — Video Tutorial