Introduction
JetPorch, or Jet Enterprise Professional Orchestrator or simply Jet, is a versatile and community-driven IT automation platform designed for configuration management, deployment, orchestration, patch management, and executing arbitrary workflows. Jet stands out for its simplicity, consistency, and speed, making it a powerful choice for managing IT infrastructure. This article will guide you through installing JetPorch on macOS using packages.
Jet Features
Before diving into the installation process, let’s briefly explore some of the key features that make JetPorch a compelling choice for IT professionals:
- Language Simplicity: JetPorch places a strong emphasis on simplicity, consistency, and stability in its design and user interface, ensuring a minimal and clean aesthetic.
- Rust-Powered Parallel SSH: JetPorch leverages the speed and efficiency of Rust to offer extremely fast multithreaded parallel SSH capabilities, ensuring rapid execution of tasks.
- Multi-Worker Distributed SSH: Expected to be available in Q4 2023, JetPorch will introduce a multi-worker distributed SSH fanout, allowing for efficient task execution across multiple hosts. Additionally, true planetary-scale automation is planned for December 2023/January 2024.
- Enterprise Security and Audit Focus: Security is a top priority for JetPorch, ensuring that your automation processes are carried out with the highest level of safety and compliance.
- Friendly Documentation: JetPorch is committed to providing user-friendly and easy-to-read documentation, making it accessible to both newcomers and experienced users.
It’s worth noting that JetPorch is led by Michael DeHaan, the original creator of popular IT automation tools such as Cobbler and Ansible, which adds to its credibility and expertise in the field.
Installing JetPorch via Packages
Now, let’s walk through the steps to install JetPorch on your macOS system using packages.
- Rust Packages:
Before installing JetPorch, you need to have Rust and Cargo installed on your macOS system. These are essential prerequisites for JetPorch. To install them, follow these steps using Homebrew for macOS:
$ brew install cargo-binstall
$ brew install rust
These commands will use the Homebrew package manager to install Cargo and Rust on your system, ensuring that you have the necessary tools for the installation.
- Install JetPorch:
With Rust and Cargo installed, you can now proceed to install JetPorch. Use the following command to install the latest release of JetPorch:
$ cargo binstall jetp
This command will fetch the JetPorch executable and install it into your macOS system’s ~/.cargo/bin directory.
- Verify Installation:
After the installation process is complete, you can verify the installation by checking the location of the JetPorch executable and its version. Use the following commands to do so:
$ which jetp
$ jetp --version
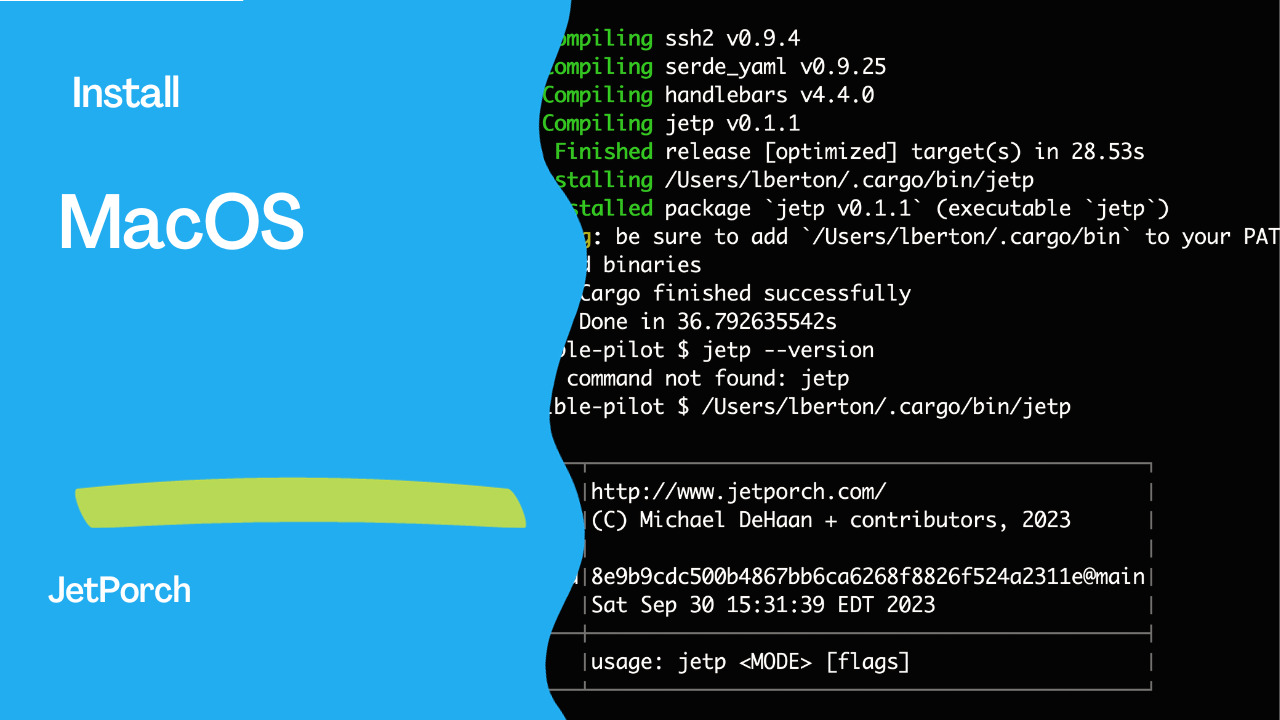
The first command will display the path to the JetPorch executable, confirming that it is installed. The second command will show you the installed JetPorch version, ensuring the installation succeeded. A successful installation outputs the following text
jetp --version

┌─────┬─────────────────────────────────────────────┐
│jetp │http://www.jetporch.com/                     │
│     │(C) Michael DeHaan + contributors, 2023      │
│     │                                             │
│build│8e9b9cdc500b4867bb6ca6268f8826f524a2311e@main│
│     │Sat Sep 30 15:31:39 EDT 2023                 │
├─────┼─────────────────────────────────────────────┤
│     │usage: jetp <MODE> [flags]                   │
└─────┴─────────────────────────────────────────────┘
Conclusion
JetPorch is a powerful IT automation platform with various features that simplify and streamline IT management tasks. Following the steps outlined in this article, you can easily install JetPorch on your macOS system using Rust packages, providing you with a robust tool to automate your IT workflows efficiently. Whether you’re a seasoned IT professional or just starting with automation, JetPorch is a valuable addition to your toolkit.
Subscribe to the YouTube channel, Medium, and Website, X (formerly Twitter) to not miss the next episode of the Ansible Pilot.Academy
Learn the Ansible automation technology with some real-life examples in my
Udemy 300+ Lessons Video Course.

My book Ansible By Examples: 200+ Automation Examples For Linux and Windows System Administrator and DevOps

Donate
Want to keep this project going? Please donate